

Set up a Shortcut for AI receipt capture: take a screenshot, then hand it straight to Vitae to recognize. Once built, bind it to the Action Button, Back Tap, or Control Center — when you see a bill screenshot, record it in one tap without opening the app. The video below walks through the full flow, from creating it to using it.
First, build a Shortcut
- Open the Shortcuts app and tap the “+” in the top-right to create a new one.
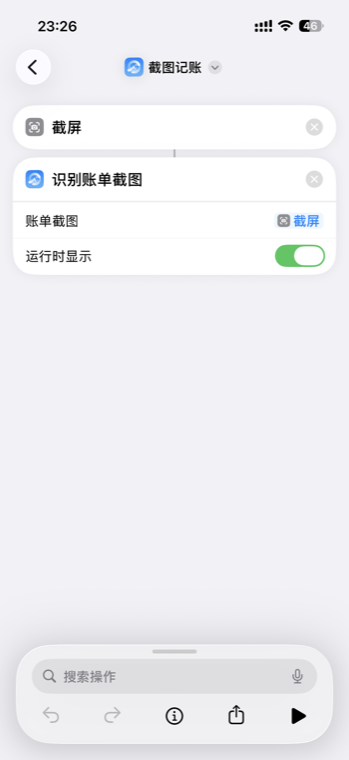
- Add the “Take Screenshot” action (search for “screenshot” in the search box).
- Add Vitae’s “Recognize Bill Screenshot” action, set “Bill Screenshot” to the “Screenshot” from the previous step, and turn on “Show When Run”.
- Give it a name (such as “AI Receipt Capture”) and you’re done.
This simplest Shortcut is now ready to use. The exact setup varies slightly depending on which entry point you bind it to — see below.
Two setups: it depends where you trigger from
Option 1: Action Button / Back Tap (recommended, two steps)
When you trigger from the side Action Button or by double-tapping the back of the phone, the bill page is right there on screen, nothing is covering it, so you can screenshot directly:
- Take Screenshot
- Recognize Bill Screenshot (set Bill Screenshot to “Screenshot”, turn on “Show When Run”)
Option 2: Trigger from Control Center
Control Center sits on top of the bill page, so you have to close it first to capture the bill underneath:
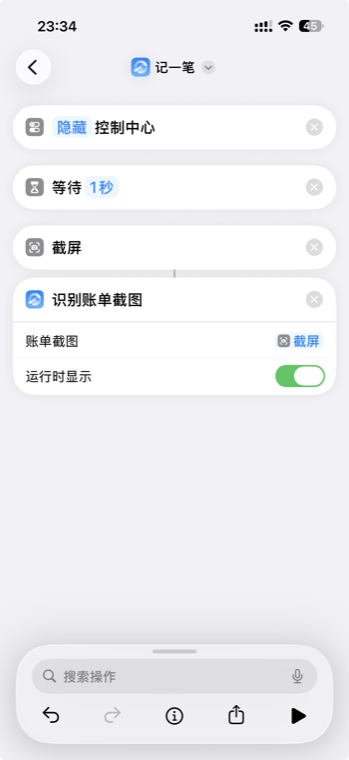
- Hide Control Center
- (Recommended) Wait 1 second — so you don’t screenshot before Control Center has fully closed
- Take Screenshot
- Recognize Bill Screenshot (set Bill Screenshot to “Screenshot”)
Bind it to a handy entry point
Once the Shortcut is built, bind it to whichever entry point you prefer, so a single action triggers it from then on:
- Action Button (iPhone 15 Pro and newer): Settings → Action Button → swipe to “Shortcut” → pick your “AI Receipt Capture”. After that, one press of the side button records a transaction.
- Back Tap (most newer models): Settings → Accessibility → Touch → Back Tap → Double Tap → pick “AI Receipt Capture”. After that, double-tapping the back of the phone records a transaction.
- Control Center: Press and hold an empty area of Control Center → Edit → Add a Control → pick “Shortcut” → assign the Control Center version. Remember to use the “Option 2” setup above.
FAQ
Why do some setups require “Hide Control Center”?
Only when you trigger from Control Center — Control Center covers the bill page, so you have to close it first to capture the bill. When you trigger via the Action Button or Back Tap, nothing covers the screen, so this step isn’t needed.
Action Button or Back Tap — which should I choose?
It depends on your model and habits. The Action Button is the physical key on the side of the iPhone 15 Pro / 16 series — just one press; Back Tap is a tap on the back of the phone, supported on most newer models. Both are convenient, so pick whichever you use more.
What do I do after triggering it?
Once the screenshot is recognized into a bill, it goes into Vitae’s “To Confirm” list — same as using AI receipt capture directly: review each one, then save in bulk. See AI Receipt Capture for details.